Liverpool 1 Manchester United 0: Stats Zone Analysis
As an owner of a shiny new smartphone, I've recently become acquainted with FourFourTwo's excellent Stats Zone application. Typically, they've now made it available on the web too anyway, meaning that I didn't need the new phone to access it after all.
Anyway, now that I can use Stats Zone, I'm going to post interesting things from there that I spot from the latest Liverpool match, to try to get to the bottom of why the result turned out as it did; in this case, spectacularly well.
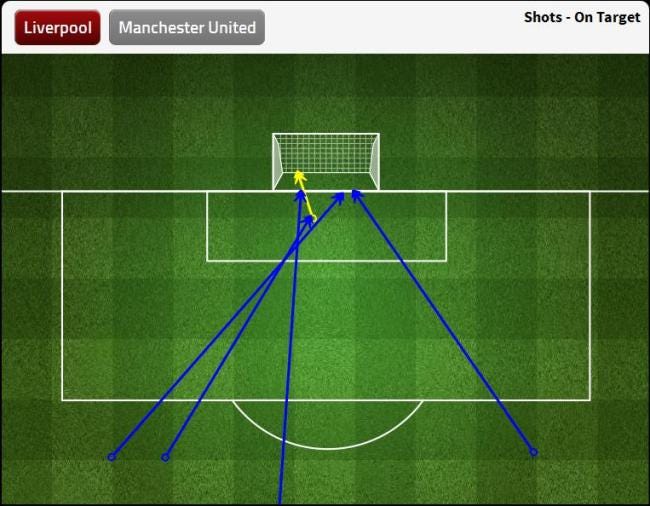
The first thing to note is that it's just as well Liverpool scored when they did. The goal was the only shot on target that the Reds mustered from inside the box, and also the only one from a central location (e.g. within the width of the six yard box) that started within the available shot map:

Liverpool were ahead; so far, so good. But how did the Reds keep United at bay? By dealing with their primary threat of crosses superbly, and stopping their players from dribbling into the penalty box. The Red Devils' final third passing map illustrates how they were keen to get the ball out to the wing as much as possible:

However, the United players who attempted to go past Liverpool men and into the box found little joy, succeeding with none of their attempts in this area:
United's crossing fared little better either; as you can see here, just six out of a massive thirty-two attempts (and for context, they averaged twenty-five attempted crosses per game last season) found a teammate.
The majority of away crosses didn't find a United shirt thanks mainly to Liverpool's imperious peformance in the air; check out where the Reds' successful headed clearances occurred:
Nine were very close to the penalty spot, with a further two elsewhere in the box. United barely had a sniff of goal via this tactic, yet they persisted with it throughout. Perhaps a sign of a lack of imagination from their new manager?
As Liverpool defended a lead for over ninety minutes (including injury time), my star man has to be one of the Reds' backline, and based on the below dashboard, I have chosen Glen Johnson. Click on the image to see a larger version of it.
What we can see here may not appear to be too much involvement to the naked eye, but there is a remarkable amount of good stuff here:
Six out of six attempted tackles won, across all three thirds of the pitch and including one within the Liverpool goal area;
Three interceptions, including two in the final third, suggesting that Johnson was employing the pressing that Brendan Rodgers wants to see from his men;
Two shots blocked, with both being in central positions in the Reds' penalty box; and
Two successful clearances, with one most notably in the six yard box.
I certainly hope that Johnson is not absent through injury for too long, and is not risked unnecessarily by England. His contribution could be key in Liverpool's next match, away at Swansea City.
As this is my first attempt at this type of analysis, all constructive feedback will be gratefully received in the comments below. Thanks in advance.
Recent posts you might like:
What A Difference A Year Makes - The gulf between Liverpool's form in 2012 and 2013 is quite remarkable...
Please check out my other articles, and follow me on Twitter or via Facebook. Thanks.
